I love to write about my experiences, show how to do the things that I’ve learned. To give freely of my knowledge, even if only 1 person actually reads this blog.
I’ve been working on catching up on the summer of 2012, I did an internship that summer and although we had a lot of pictures, we didn’t post them anywhere. I started the family blog over a year ago, and I never intended to do retro posts, I felt that we should document that time.
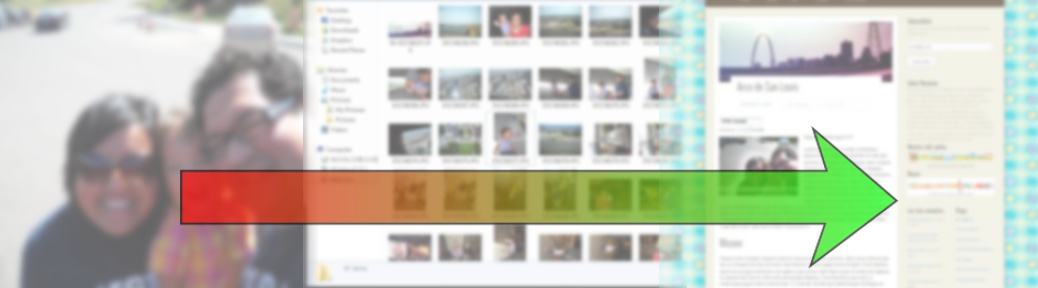
I wanted to find ways to document our vacations on a blog post. There is a lot of thing on family vacations, but there were no tips how to write a post about your vaction, how to convert hundreds of images into a good post. So this is my atempt at that.
Begin with the End in Mind
 Yes, cliché, but so very true. Gather all the images into one place: all your DSLR images, the ones you took with your phone, ask relatives if they have images, videos, etc. Put everything in one place and look at them once over. What is the feeling you want to transmit on that post. I write one word themes: excitement, fun, sun, bright, awe, etc. That is the feeling that will guide you throughout the post. Your goal will be to have your readers feel that.
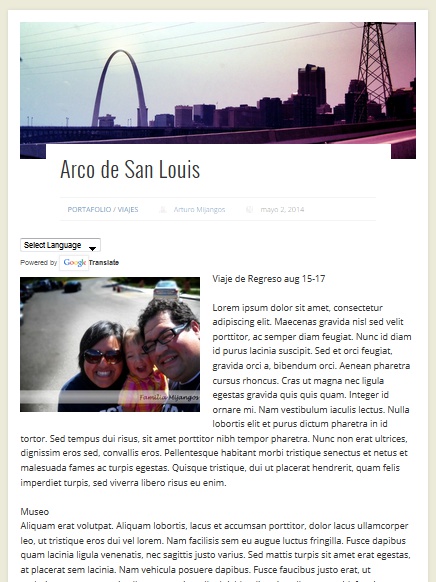
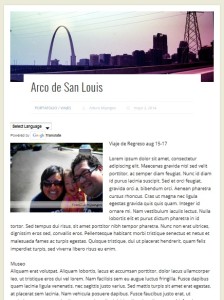
I will use this post on our trip to Saint Louis as an example. I chose to have my readers feel small, because that is how we felt when were were at the monument.
Select the Images with Purpose
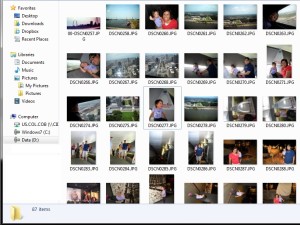
This is always the harderst thing for me, for this trip to the Saint Louis Arch I had over 200 images. How was I ever to going to reduce that number to a handful of images to use. I normally make a copy of my images and I start deleting, I do multiple passes, this is sort of the way I do it:
- Any images that are just bad, blurry or empty
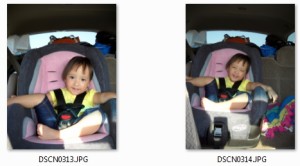
- Remove some duplicates, there will be pictures of the same thing in different angles, I remove most of the duplicates leave a few for further consideration
- Images that don’t convey your theme, I’m not saying to remove everything, just think about your theme and remove some more.
I’m able to remove around 50% of the images using the previous 3 steps. There will always be images that you fall in love with, so make sure you keep those. There will be a time when you will have to make a decision, but right now just reduce your images to a manageble set.
Design the Flow
By this point I get sick of just looking at pictures and videos. Most of the time I feel overwhelmed and think that I will never be able to write a post that is not 2000 words long that not even my family would want to read. So I leave that behind and start thinking of the flow.
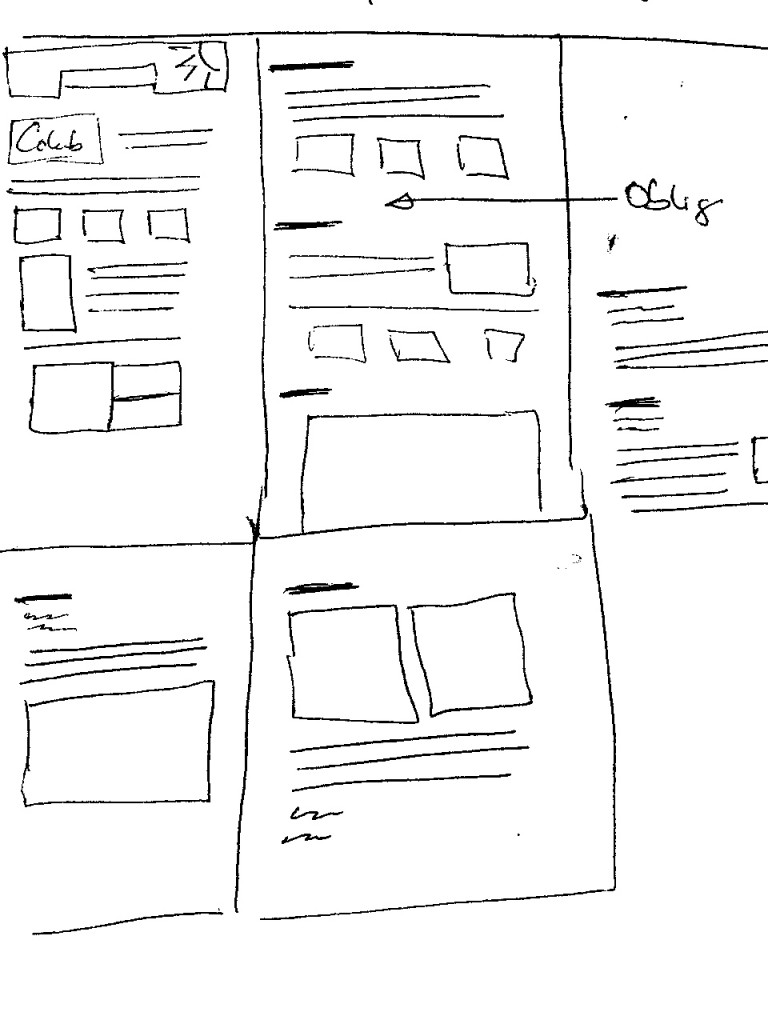 I use blank paper and I start drawing headings and boxes. I first think about what I want to write about, which experiences make sense. What emotions did I feel during the trip and how will they all fit together. I think of my audience, mostly my family, if we were gathered together what do I want to tell them. One thing I always tell myself is: “You are not making a documentary on the place.” I don’t want to be just showing images of building and exhibits, I want to document my family, and the emotions we’ve felt in those places. Yes there will be images of buildings, but they should make us remember those feelings.
Depending on the length of the post I will write 3-4 headings. For the Arch post I settled on 4 headings: the museum, the math behind the arch, being at the top, and our return trip. On my piece of paper I put down the heading, and put some boxes with images that I thougth would be good. I wanted to put 2 images side by side, on for the east side of the monument and another for the west side. I wanted an image of the “elevators.” I also think of what I call, obligatory picture, you know the one that shows the name of the place with your whole family in from. Yes, the Disney Land Mickey Mouse garden in the entrance of the park. So in a few places I just write, oblig, to make me look for an image that would be that, THE images for that section.
I also represent with smaller squares images that I think will be good to give context or to tell part of the story, but if people skip them I’m fine. WordPress uses galleries, and I use galleries in different ways on my posts, but those smaller boxes are the galleries. I use 3 column galleries to most of the time I think of how many images I want to add to a certain sections in increments of 3 (3, 6,9, etc).
Back to the Images
Having a good grasp of what I need to do, I go back to the images and it becomes a lot easier to find the images I want to use. There are times when I know I need 5 images and I still have 30, I create a new folder, put the 30 images inside and start deleting more images. Sometimes I have to do the oposite, I have to look at all the images and think of 3 that I HAVE to keep, so I move those to the new folder, that eases the process.
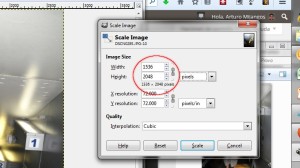 Many, many times I know I will need 5 and I end up with 10 in the set, and I’m fine. I start editing process, I use GIMP for the post processing. I’ve found that at this point there are images that I thougth that were amazing, and then looking at them in a post production state, they aren’t really that good. Or I thougth I could straighten them, but then they don’t work out. So it is good to keep a few extras on hand. I reduce the resolution to about 2048px x 1536px; it is still HD, but not too big. WordPress creates lower resolution copies for various applications, so that makes it even easier.
Start Building Your Post
 At this point is where I start putting my blog post together. Begin by getting some sample text to help me see what it’s going to look like. I use lipsum.com to get dummy text, it helps me picture inside the post what the final product will look.
I then start adding the images to the sample text, I use my paper flow to guide what I’m putting where. Not 100% strict, some images looke better in one way rather than another.
You are done with images.
Start Writing
Once I know how the post is going to look like, and I see the images and I start remembering the events, all the emotions come back. I then convey those emotions and memories in the text. Some explanations takes long paragraphs, some take a caption on an image.
I picture my family (my audience) waiting for me to tell them about our vacation. I think of my daughter going back in time and reading about the time she walked, or rode a bike. I want her to see those images, but also remember those stories. I write to her, I write to make those memories last longer.
This is not how I would write a post like this one, but this is how I write a post about our family.
This is the result, from a bird’s eye view:

 Decisive: How to Make Better Choices in Life and Work